Introduction to Quanscient Allsolve
Introduction to projects
The Quanscient Allsolve home view shows the projects overview. It is where you can view and manage all the projects that you have access to.
- Filter the list of projects: The project list can be filtered by project physics or used labels.
- Search for projects: You can also search for projects by name or description, making it easy to find specific projects that match certain keywords.
- View project details: You can navigate to each project’s details page by clicking on the project card. This is where you configure the project and run your simulations.
Filtering the list of projects allows you to find exactly what you’re looking for, quickly. You can configure the list to show only projects that are in “Full script” mode.
Additionally, you can filter the list to only show projects that have been created with specific physics. This filter is an “or” filter, which means that it will match any projects that have any of the selected physics, it’s easy for you to quickly find projects that are relevant to your interests or needs.


How to start a project with a geometry
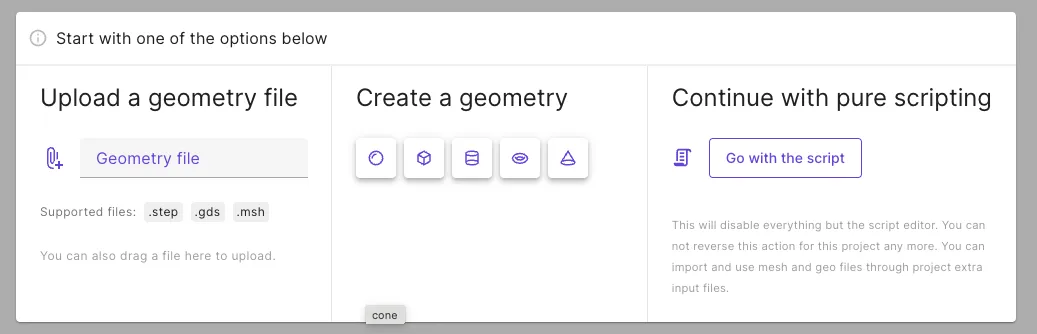
To start a project with a geometry in Quanscient Allsolve:
- Click create new project and fill in the project details.
- In the project creation dialog, you can select from a variety of pre-defined shapes, such as a sphere or a cylinder.
- Alternatively, you can import your own geometry using a file format like STEP or GDSII.
- Once the shape or geometry is selected, Quanscient Allsolve will create a new project with that shape or geometry.
How to do a full script project
Creating a new project using scripting in Quanscient Allsolve can be achieved with the following steps:
- Click create new project and fill in the project details.
- Select the option “Go with the script”
- In the project interface, you will have access to the main script editor where you can add multiple script files if desired.
- You can upload any necessary mesh files using the extra input files functionality.
- In the script editor, use the “quanscient” module aliased
qsto access all necessary functionality and use the built-in autocomplete for functions. - When your script is ready, set the desider node count and run the simulation.

How to start with a STEP import
Creating a new project using a STEP file as base in Quanscient Allsolve can be achieved with the following steps:
- Click create new project and fill in the project details.
- Click on file input and use the system file selection or drag your file to “Upload a geometry file”.
- The model 3D view opens after file upload and importing has finished. The volumes and surfaces of the model can be viewed in the entities list.
- You can edit the file import offset and configure a separate cleanup step to remove any orphan geometric entities that do not belong to some parent entity.
- Click on “Confirm model changes” or continue editing your model.

Introduction to the model view controls
The model view controls in Quanscient Allsolve provide various options for viewing and manipulating the model. These controls can be found in the top left corner of the model view.

- Reset view: Reset the model view translation and zoom so that the full model is visible.
- Opaque/Translucent mode: Enable translucency or transparency of model surfaces.
- Show axis: This tool can be used to show the axis in the model view. The direction of the axis can also be viewed in the bottom left corner of the model view.
- Camera projection: Switch between perspective or parallel projection of the model view.
- Hide volumes: This tool can be used to hide individual volumes in the model. Hidden status of the volumes can be seen in the entity tree under the volumes list. The hidden volumes can also be toggled in that same list. To unhide all volumes, click the “Clear hidden” button.
- Hide surfaces: This tool works the same as the hide volumes tool, but for surfaces instead of volumes. The hidden surfaces can also be viewed and toggled in the surface list. And the “Clear hidden” button will go back to the initial state.
Model view camera interactions
Model view camera can be rotated, panned, spinned and zoomed with the mouse. You can refer to the action key modifiers directly from the controls popup.

Introduction to regions
Regions in Quanscient Allsolve are sets of entity tags that allow you to reference and group certain parts of a geometry for various purposes such as assigning material properties or defining boundary conditions. A region always has entities of one dimension, never for example volumes and surfaces.
Each entity within the geometry, such as a volume, surface or point, has a unique integer identifier called a tag. These tags can be used to identify and reference the entity within the application. You can view the tags of entities in the entities list.
When you create a new region, you select specific entity tags to group them under the same region. These regions can then be used throughout the application to reference and define the specific geometries.
Public and private regions
There are public and private regions in Quanscient Allsolve. Public regions can be added through the properties section while a private region can be assigned to only for example a material in a project.
Private regions can also be elevated to public by clicking on button in Region target input and applying the current settings.
Advanced region picking
Apart from clicking the model, you can select tags by creating a picking rule or by selecting from the entity list.

Entity list dialog also has quick actions for selecting all, nothing or only visible entities.
